PDFDepth · User Manual
How to use the workspace — every feature, step by step
A full tour of PDFDepth: the eleven modes, the AI tools, and every workflow in between — with real screenshots from the live app.
Chapter 1
Getting started
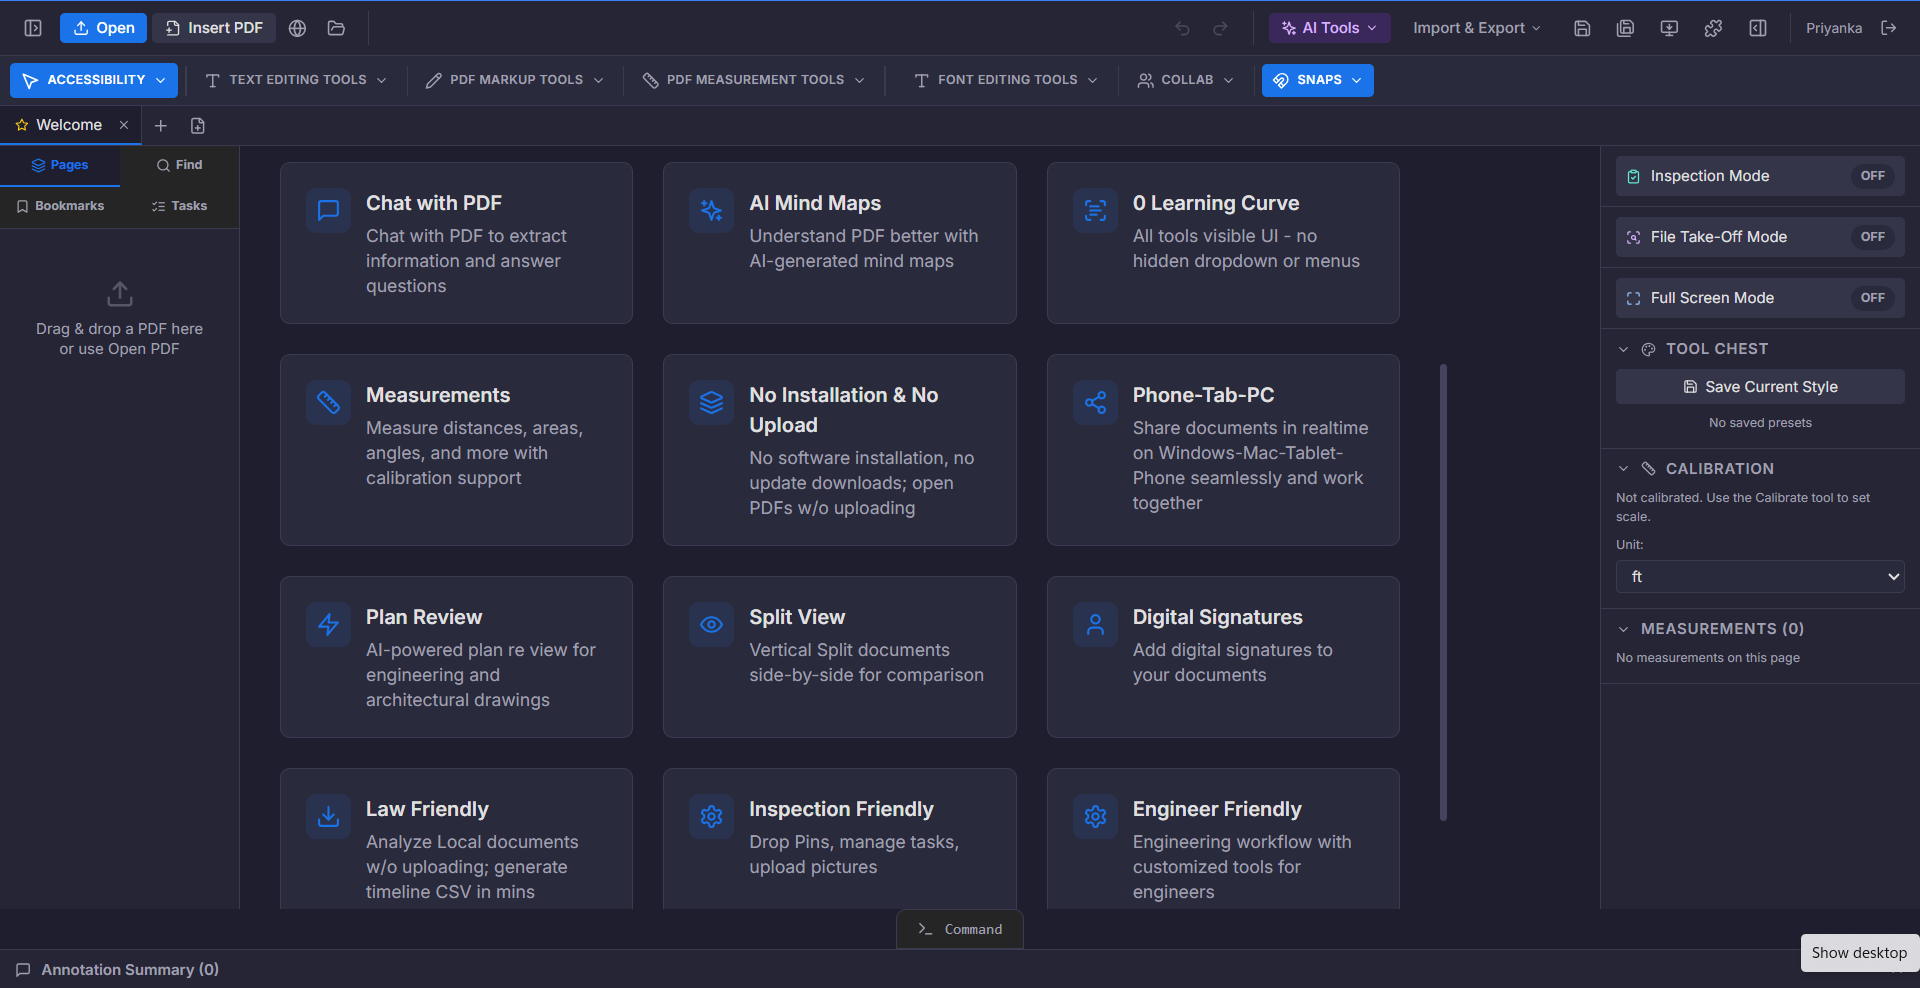
PDFDepth (the Blueprint PDF workspace) runs entirely in your browser at blueprintpdf.web.app — there is nothing to install and no file uploads required for core editing. Create a free account, then drag a PDF onto the welcome screen or use the Open button in the header. The welcome cards summarize the major capabilities: chat, mind maps, measurements, plan review, signatures, split view, and more.
- 1Go to blueprintpdf.web.app and sign in (email/password or Google).
- 2Drag a PDF into the window, or click Open in the top-left.
- 3The document loads locally — the first page renders in seconds even on large files.
- 4Use Insert PDF to append pages from another file into the open document.
Your PDF never leaves your device for editing, measuring, or marking up. Uploads happen only when you choose to share a live-collaboration link or run a cloud AI feature.
Chapter 2
Workspace layout
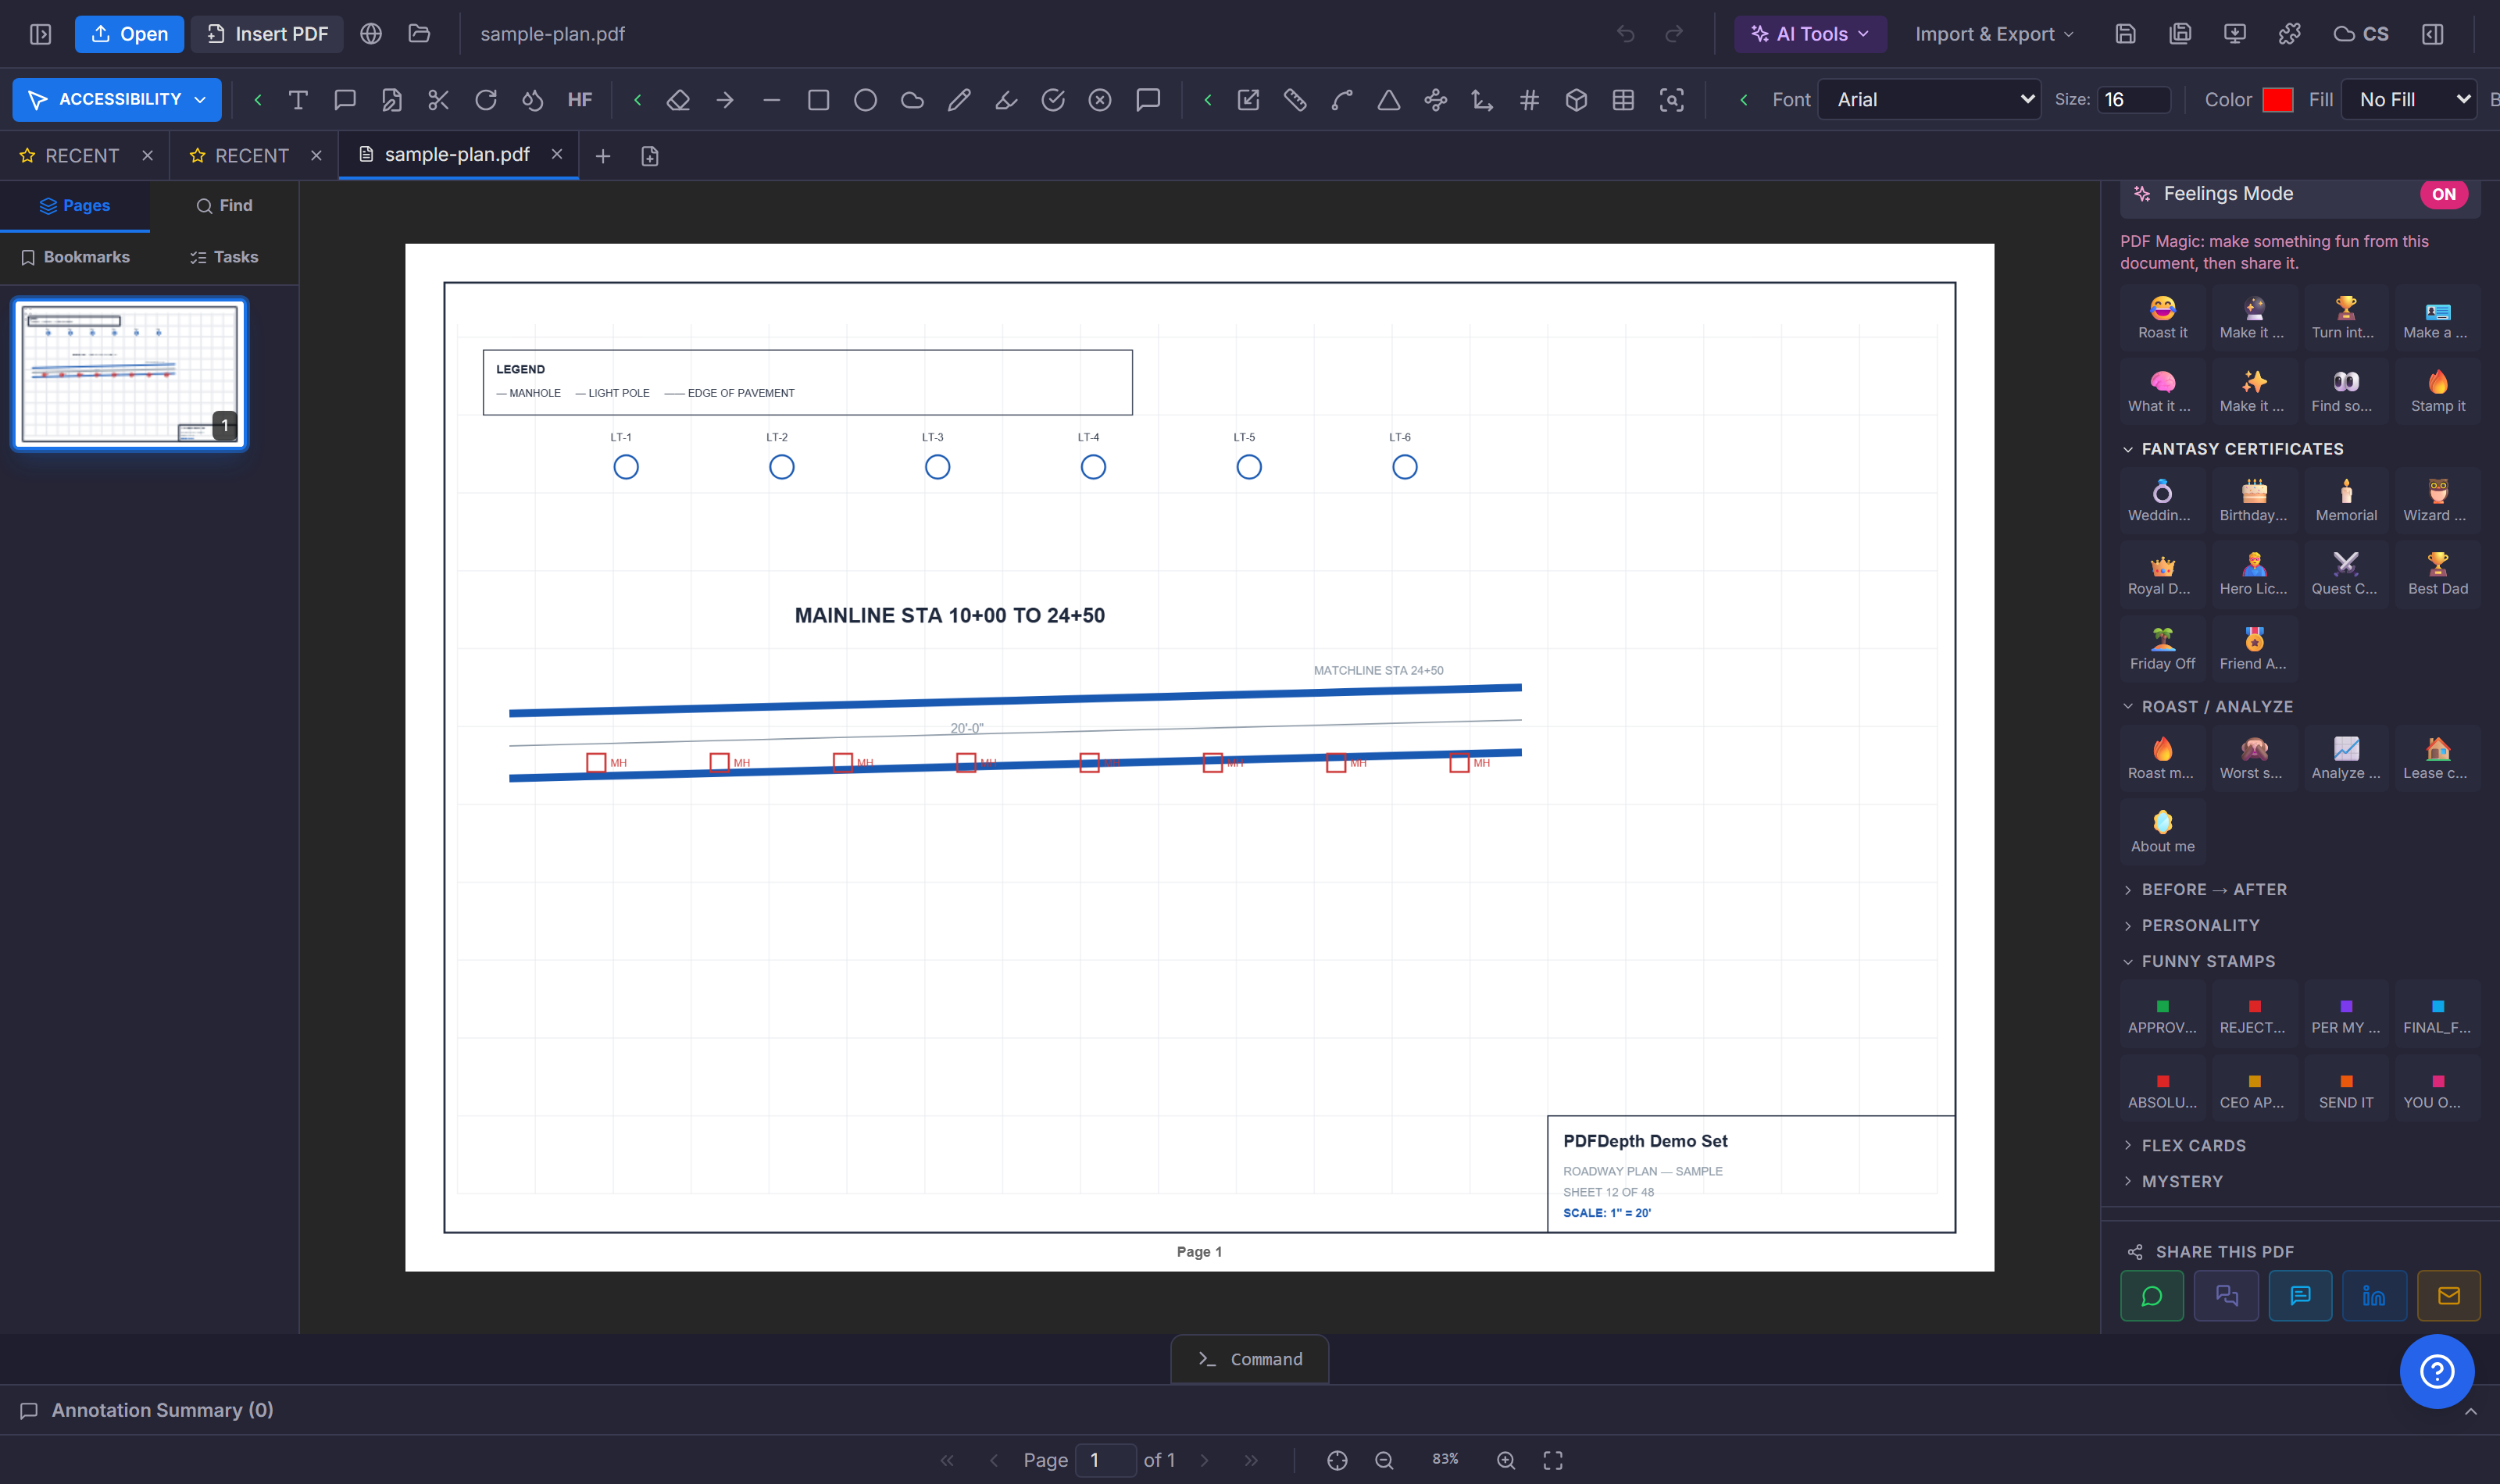
The workspace is organized around the document: toolbars on top, the page canvas in the center, panels on the left and right, and a CAD-style command line docked at the bottom.
- 1Top toolbar — file actions (Open, Insert PDF), editing toolbars (Text Editing, Markup, Measurement, Font Editing), COLLAB, SNAPS, and SMART FORMS.
- 2Header — AI Tools menu, Import & Export, user menu, and the Share controls.
- 3Left panel — page thumbnails, Bookmarks, Find (full-text search), and Tasks.
- 4Right panel — the Modes list plus the controls for whichever mode is active.
- 5Bottom — Annotation Summary, the command line, page navigation, zoom, and Share.
Press Ctrl+9 to open the command line — nearly every feature is reachable by name or alias (e.g. K for calibrate, B for pin/task).
Chapter 3
The Modes panel (right sidebar)
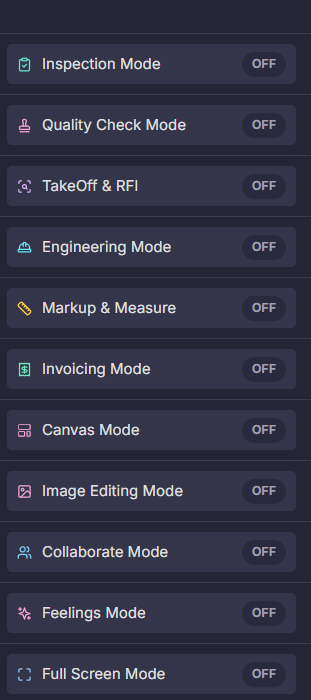
The right panel is the workspace’s control center. Instead of one static toolbar, it holds eleven modes — each toggle reconfigures the panels and tools for a different kind of work on the same document. Switch modes freely; the document stays put.
- 1Scroll the modes list and click a mode to switch it ON.
- 2The sidebar swaps to that mode’s controls; toggling OFF returns to the normal toolset.
- 3Mode state is a workspace view, not a file edit — turning modes on and off never modifies the PDF.
Chapter 4
Inspection Mode
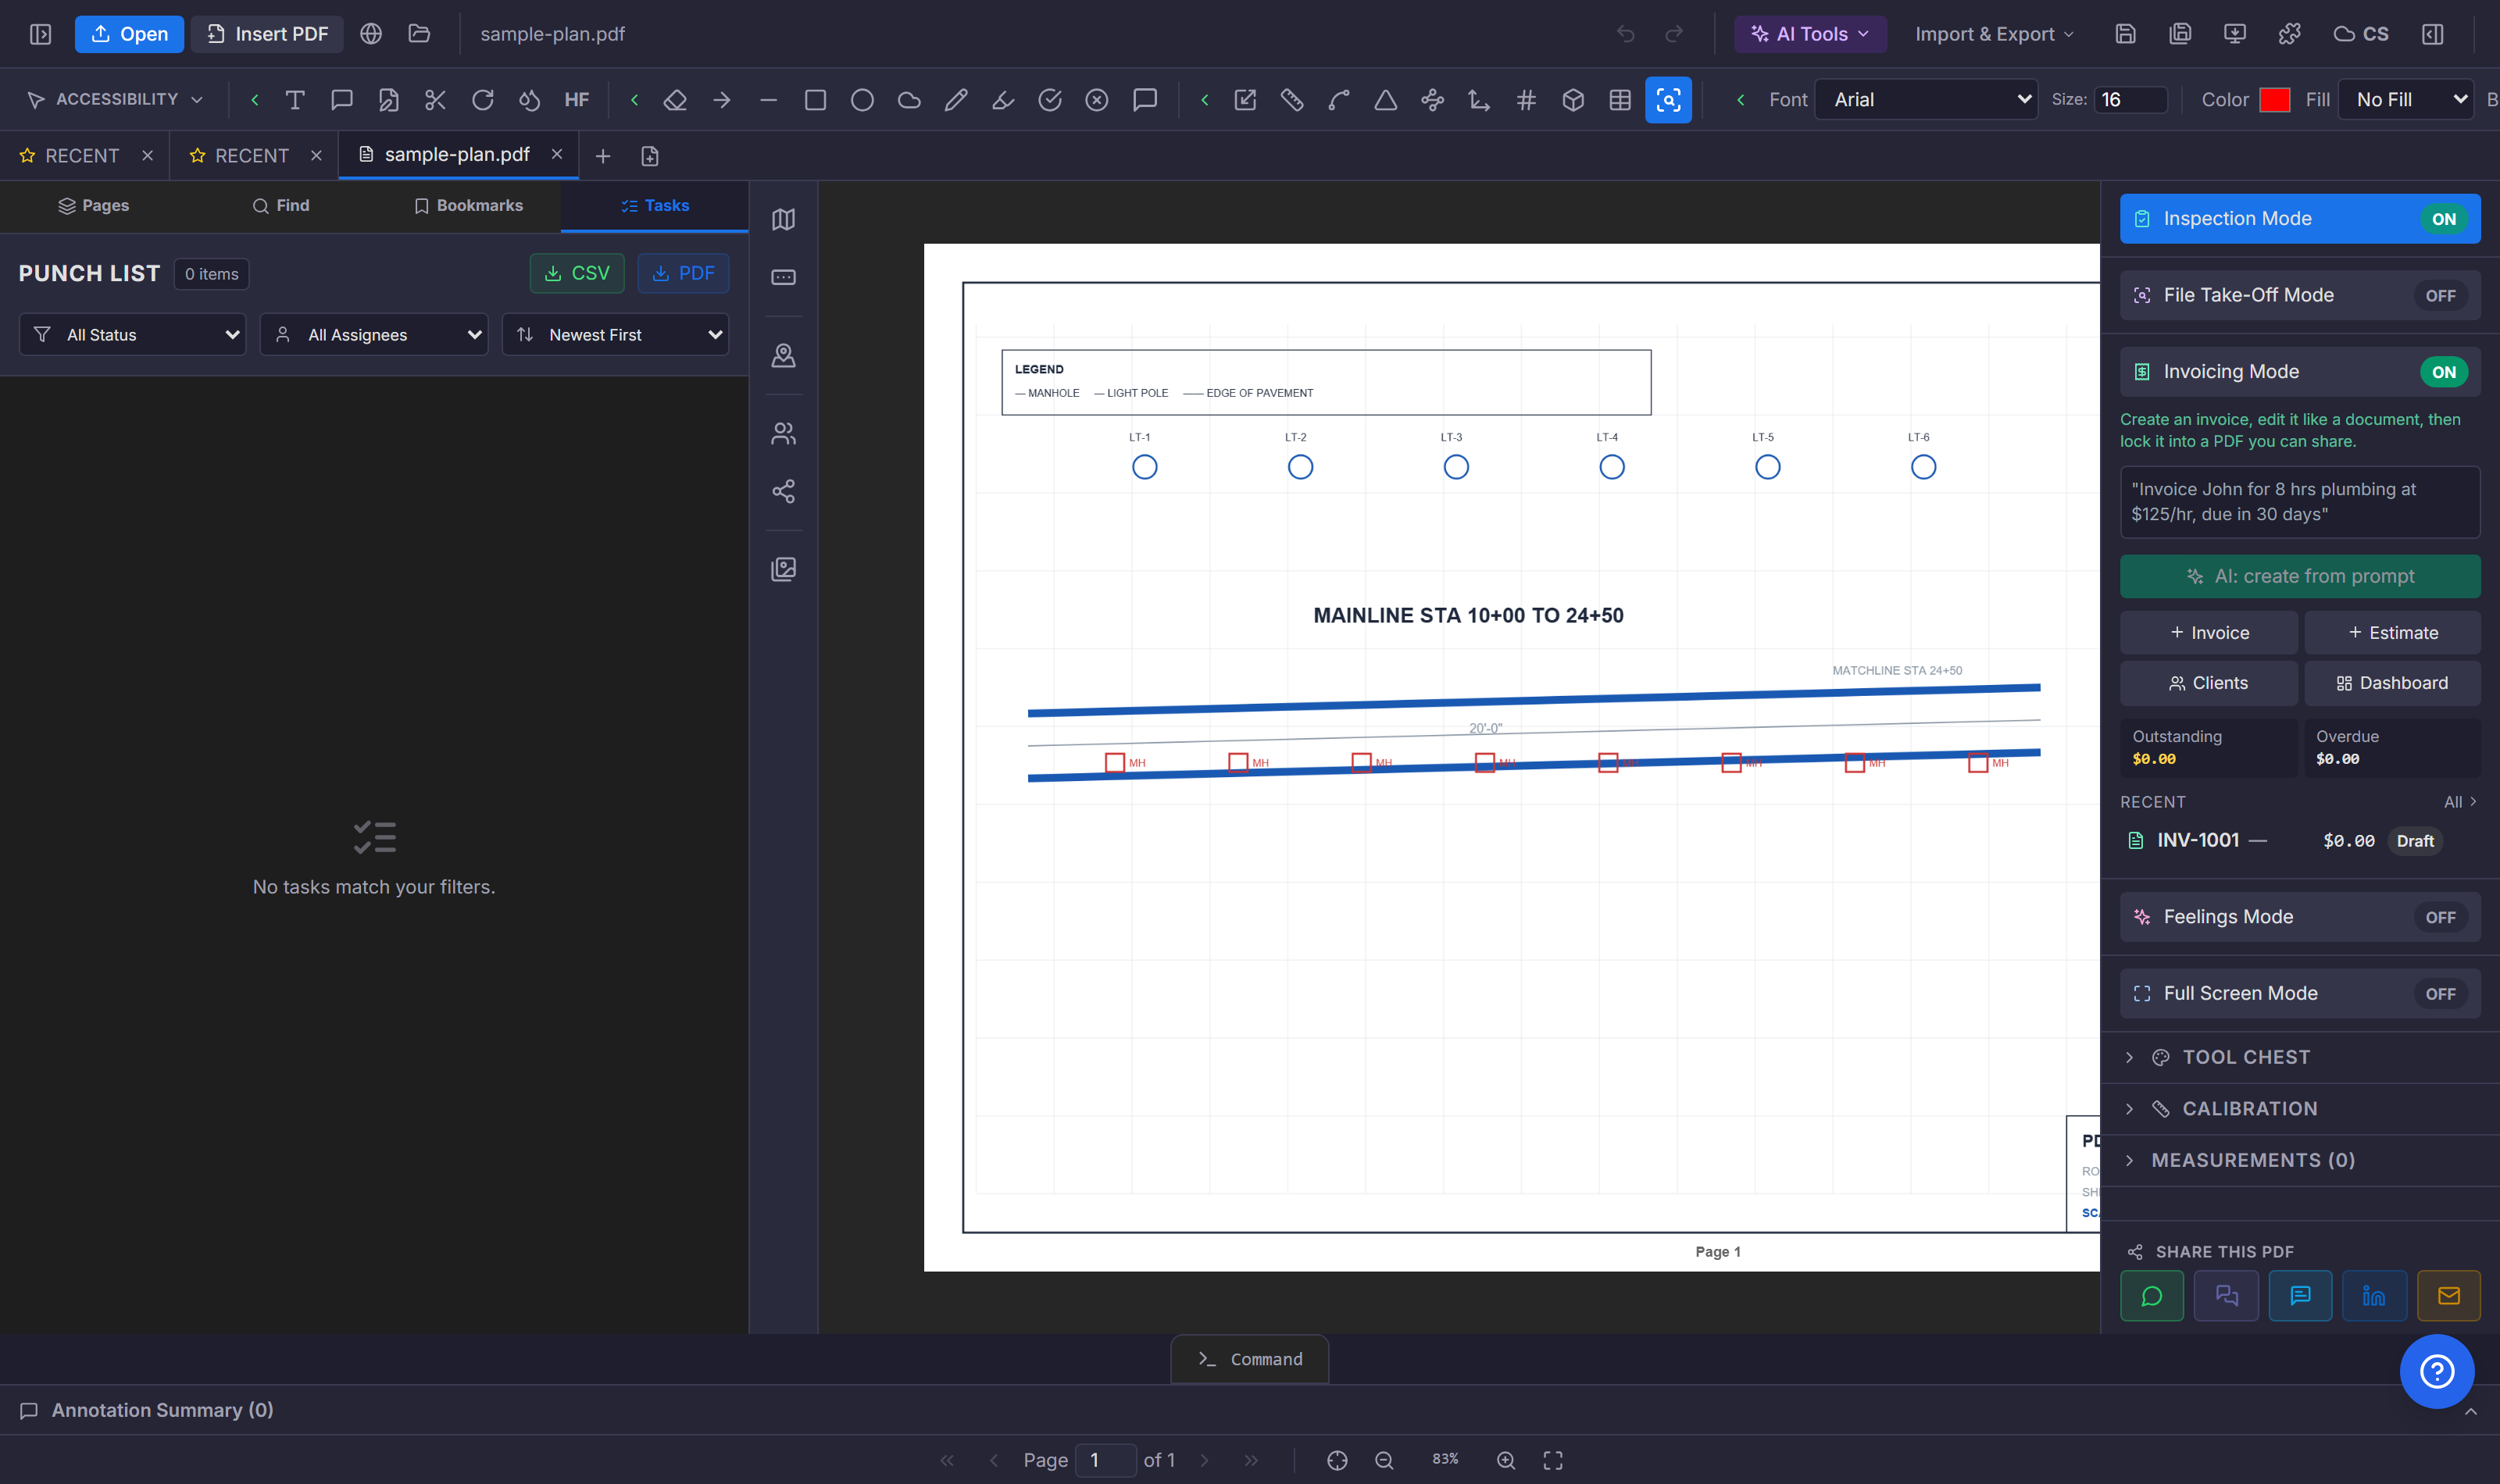
Inspection Mode runs a structured pass over the document: it swaps the left panel to the task/issue view so findings get pinned where they belong and reviewed systematically rather than by memory. Built for field inspections, punch walks, and documented review passes.
- 1Toggle Inspection Mode ON in the right panel.
- 2Use the task/pin tools (B key) to drop findings directly on the sheet — each pin can carry a photo, assignee, category, and status.
- 3Filter the task dashboard by assignee, category, or status as the list grows.
- 4Generate an executive report — formatted photo grids and findings — with one click when the pass is complete.
Chapter 5
Quality Check Mode
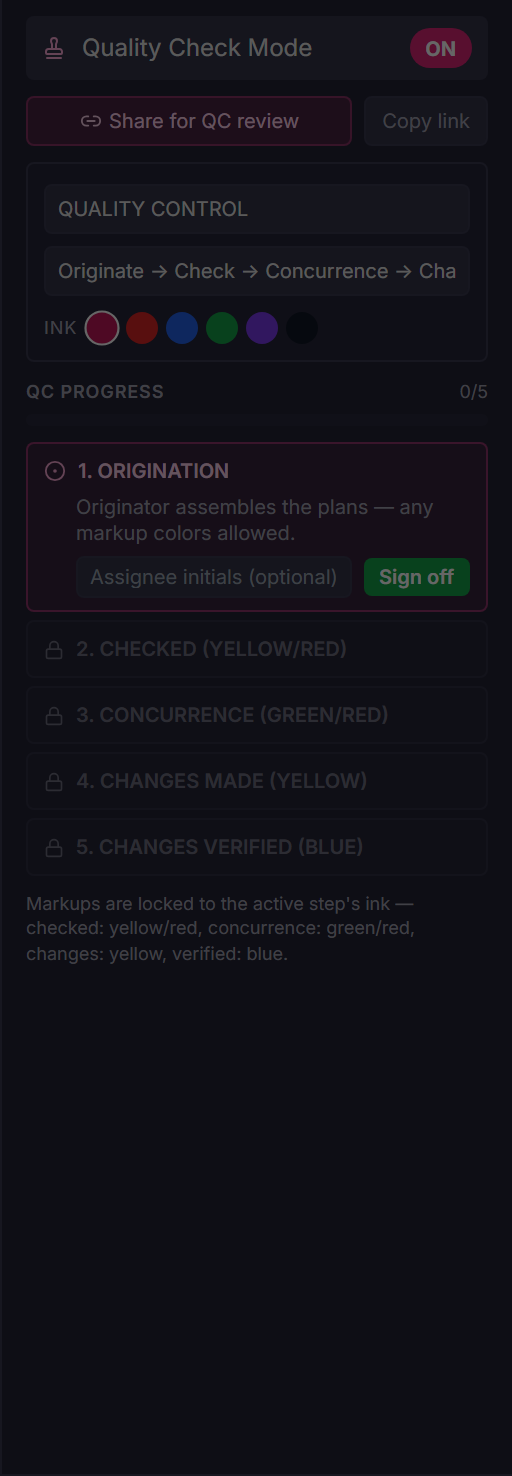
Quality Check Mode runs a disciplined five-step QC workflow on a drawing set: Origination, Checked, Concurrence, Changes Made, Changes Verified. Markup ink colors lock to the active step — checked work goes in yellow/red, concurrence in green/red, changes in yellow, verification in blue — so the review reads correctly at a glance.
- 1Toggle Quality Check Mode ON.
- 2Work the current step: sign off with initials to unlock the next stage.
- 3Use Share for QC review to send the set to a checker with the workflow state intact.
- 4Track progress at the QC PROGRESS counter (steps completed).
The color discipline is the feature — anyone opening the set can tell which ink belongs to which QC step without reading a single comment.
Chapter 6
TakeOff & RFI
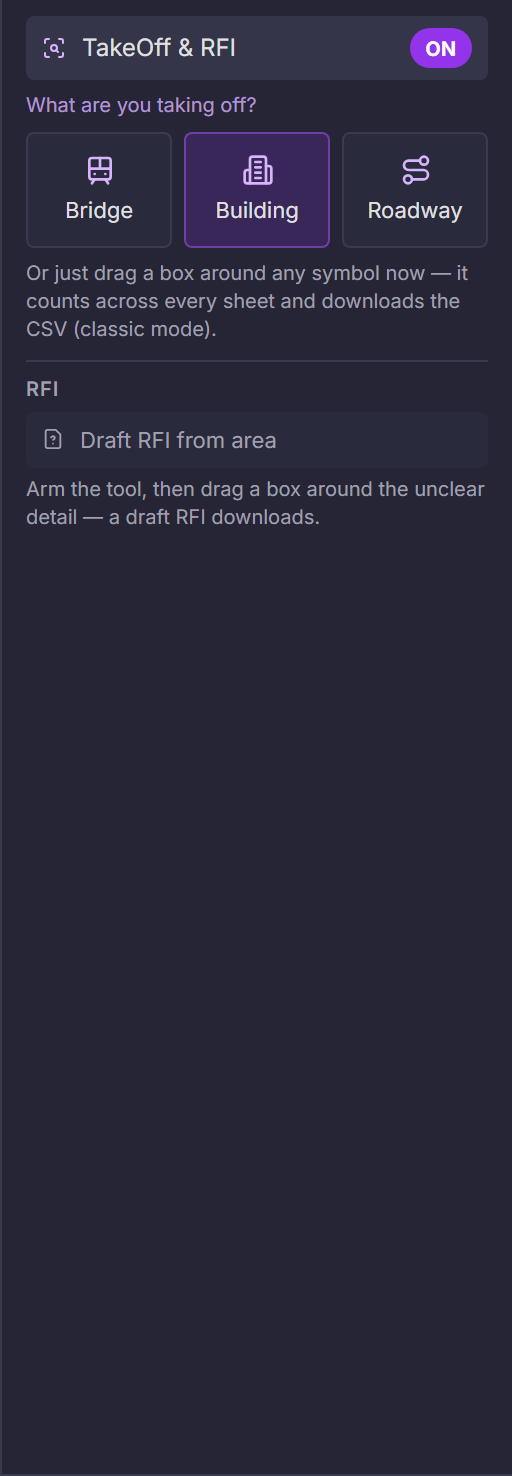
The guided takeoff mode: pick a scope (Bridge, Building, Roadway), define the item, choose the sheets, box a symbol once, and PDFDepth counts it across the selected set — extracting dimensions, measuring lengths and runs, and exporting the quantities to Excel. The same mode drafts RFIs from an unclear detail on the sheet.
- 1Toggle TakeOff & RFI ON and pick the scope — Bridge, Building, or Roadway.
- 2Define the item and the sheets to count across.
- 3Drag a box around the target symbol — the matching pass runs across the set.
- 4Review counts, extracted dimensions, and runs; export to Excel/CSV.
- 5For an unclear detail, use Draft RFI from area — drag a box and a formatted RFI downloads.
Classic mode works too: just drag a box around any symbol without picking a scope — it counts across every sheet and downloads a CSV immediately.
Chapter 7
Engineering Mode
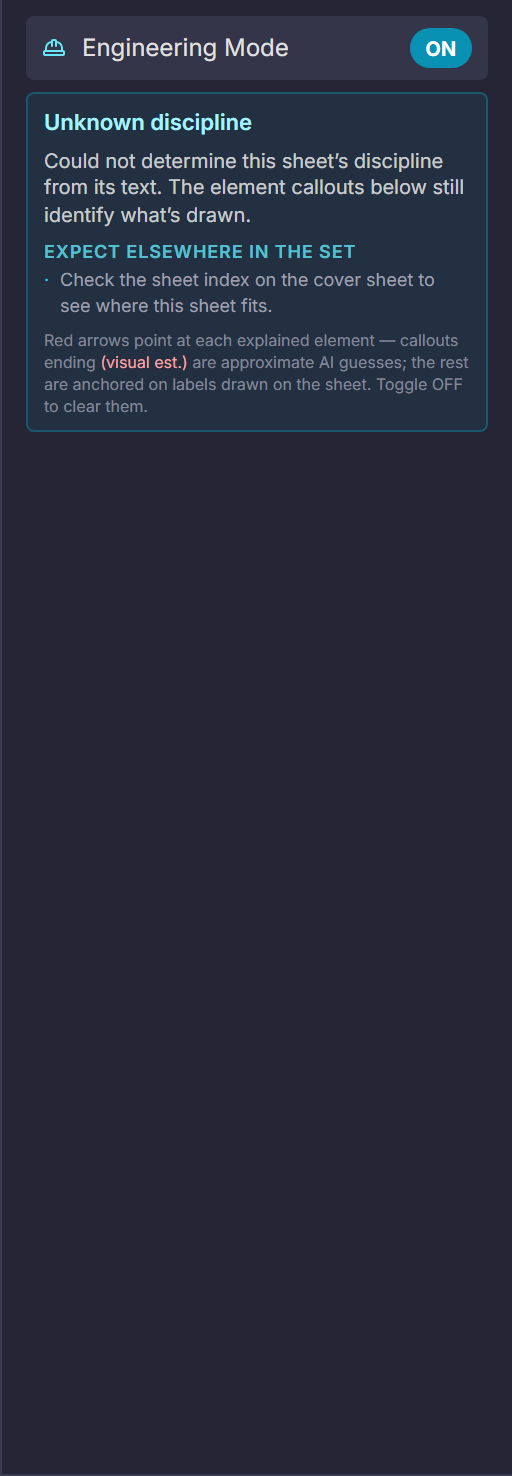
Engineering Mode explains an unfamiliar sheet. It identifies the drawing discipline from the title block and sheet numbering (S, A, M, E, P, C, FP, L, G), shows a plain-language profile of what that discipline does and what to expect elsewhere in the set, and drops temporary callouts on the elements drawn on the page. A non-MEP reader can make sense of an MEP sheet.
- 1Open a sheet and toggle Engineering Mode ON.
- 2Read the profile card — the detected discipline, what it answers, and the related sheets to expect in the set.
- 3Follow the red callouts on the canvas — each points at an explained element.
- 4Callouts ending in (visual est.) are approximate AI guesses; the rest are anchored on text actually printed on the sheet.
- 5Toggle OFF to clear all callouts — they never enter the file or the undo history.
It is a teaching lens, not a review — it explains what is drawn. Checking whether the design is right is Plan Review’s job.
Chapter 8
Markup & Measure
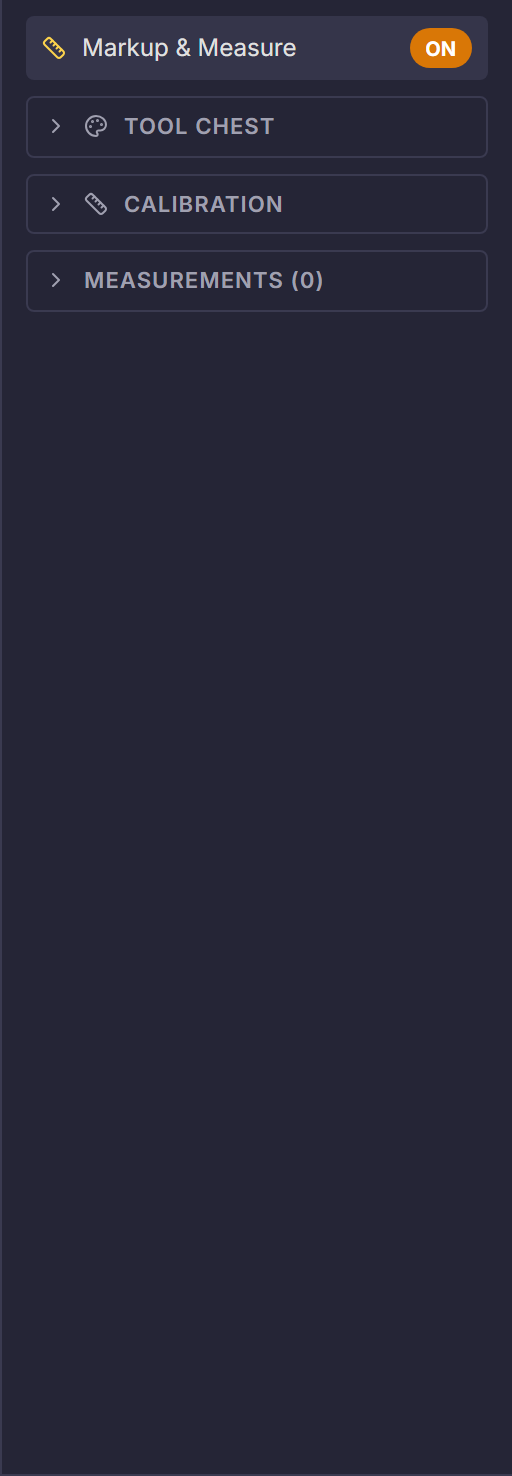
The daily-driver mode for anyone touching drawings: a full tool chest of markups (text, arrows, shapes, clouds, highlights, stamps, callouts) plus calibrated measurement — distance, polyline, area, angle, count, and volume. Set the scale once and every measurement on the sheet reads true.
- 1Toggle Markup & Measure ON to open the tool chest.
- 2Calibrate first (K key, or the CALIBRATION section): draw over a known dimension or use the printed scale in the title block — AI can auto-detect it from the AI Tools menu.
- 3Measure — distance, area, perimeter, angle, count, volume — results collect in the MEASUREMENTS list.
- 4Markup — clouds, callouts, arrows, stamps — every annotation stays a real, editable PDF object.
- 5Export the measurement list to Excel for the estimate file.
Chapter 9
Invoicing Mode
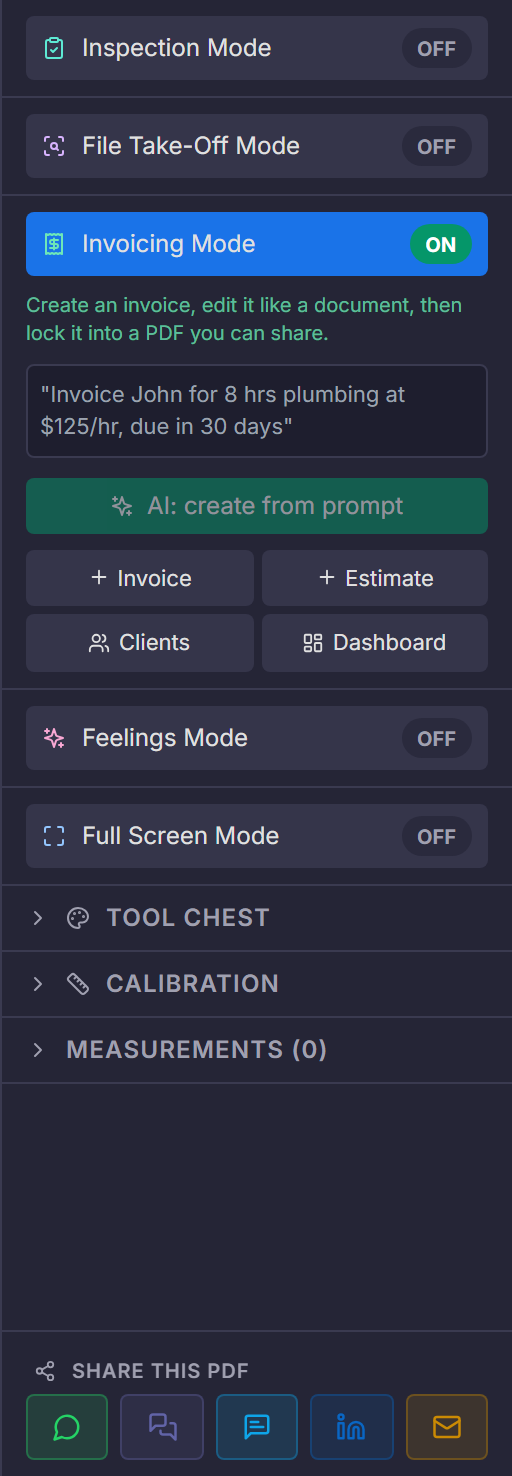
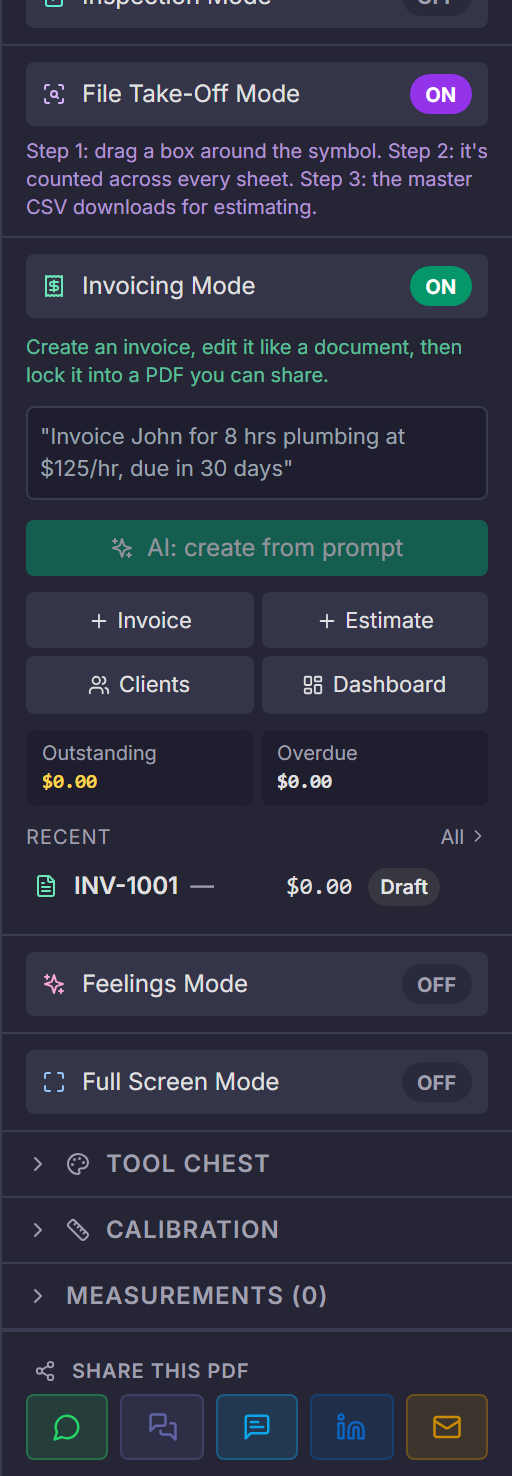
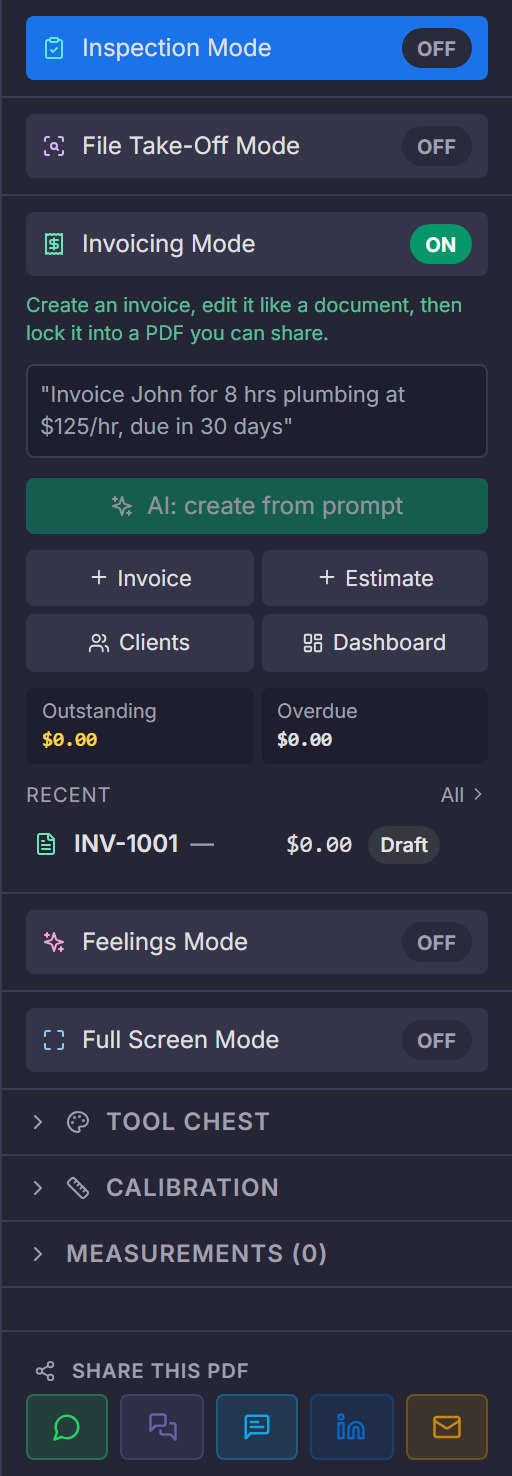
A billing workspace inside the PDF editor: describe the invoice in one sentence and AI drafts it — clients, line items, tax, payments, and overdue balances — then locks it into a branded PDF. Built for solo contractors and small firms whose accounting department is a browser tab.
- 1Toggle Invoicing Mode ON.
- 2Tell it what to bill ("Invoice Martinez for 40 hours at $95 plus materials"), or build it manually.
- 3Manage clients, track payments, and see overdue balances in the panel.
- 4Generate the PDF invoice — branded, line-itemed, ready to send.
Chapter 10
Canvas Mode
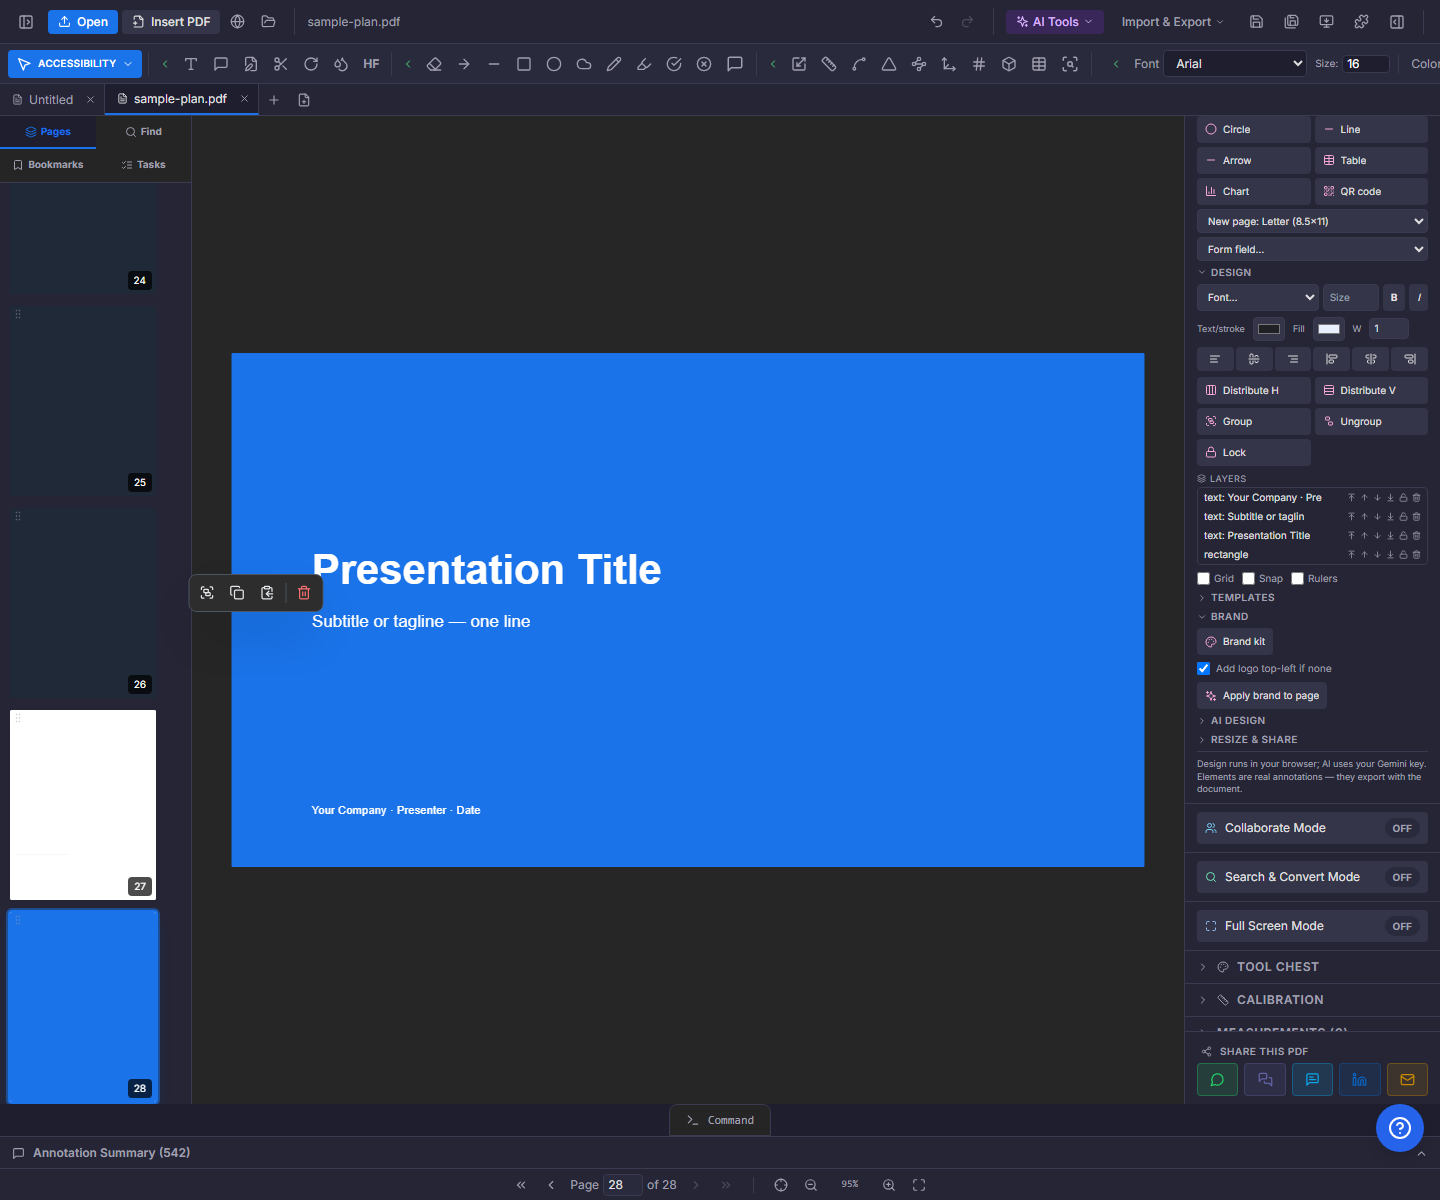
Canvas Mode turns a PDF page into a design surface: drag-and-drop text, images, shapes, lines, tables, charts, QR codes, and Smart Form fields, styled with your brand kit and backed by a 180+ template library. It covers the Canva job for document-bound design — proposals, flyers, letterhead, certificates — except the output is already a real PDF.
- 1Toggle Canvas Mode ON, then create a page (Letter, A4, presentation, card, social formats) or edit an existing one.
- 2Place elements from the insert tools; style fonts, colors, fills, strokes, and alignment.
- 3Apply a template or your brand kit — logo, colors, and fonts restyle the page in one pass.
- 4Use AI Design to draft or restyle the page from a prompt; Magic Resize for other formats.
- 5Export — the design is real PDF content, signable, shareable, and printable.
Chapter 11
Image Editing Mode
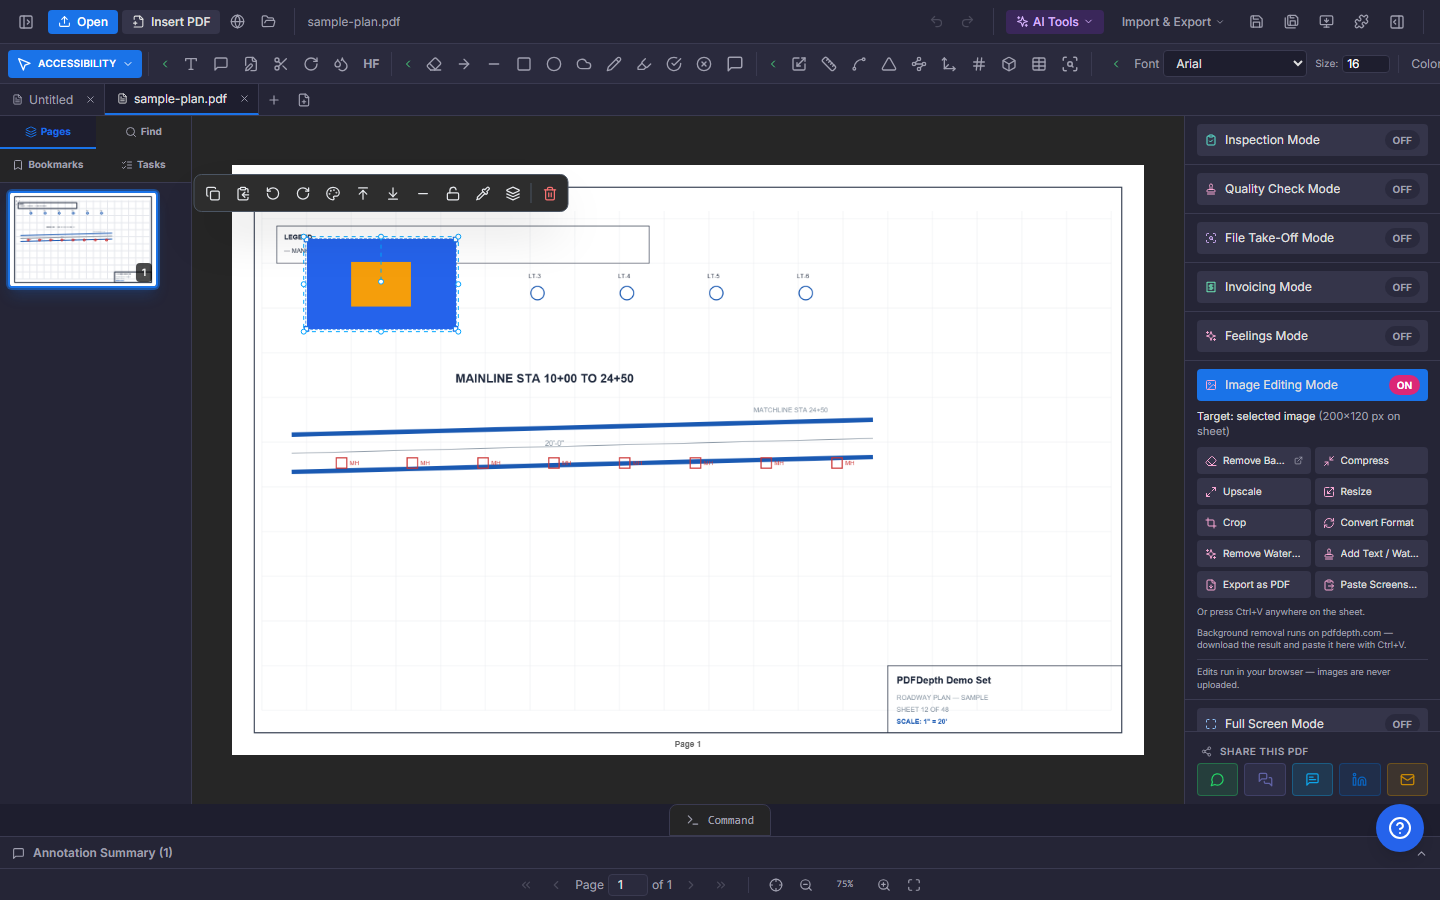
A photo-editing toolbox built into the document workflow: background removal, crop, upscale, object-level edits with Magic Move, and an AI Edit section powered by the Gemini image model for region edits, object removal/replacement, restyling, and generative expansion. It covers the background-remover-website job without leaving the PDF.
- 1Toggle Image Editing Mode ON and select an image on the page (or insert one).
- 2Use the local tools — background removal, crop, rotate, upscale — they run in your browser.
- 3Magic Move detects objects and lifts them into movable layers.
- 4AI Edit (needs your Gemini API key in Settings) handles region edits, object swap, restyle, and expansion.
- 5The edited image stays on the page as real PDF content.
Several of these tools also exist free on pdfdepth.com/free-tools for one-off jobs — background removal included.
Chapter 12
Collaborate Mode & smart links
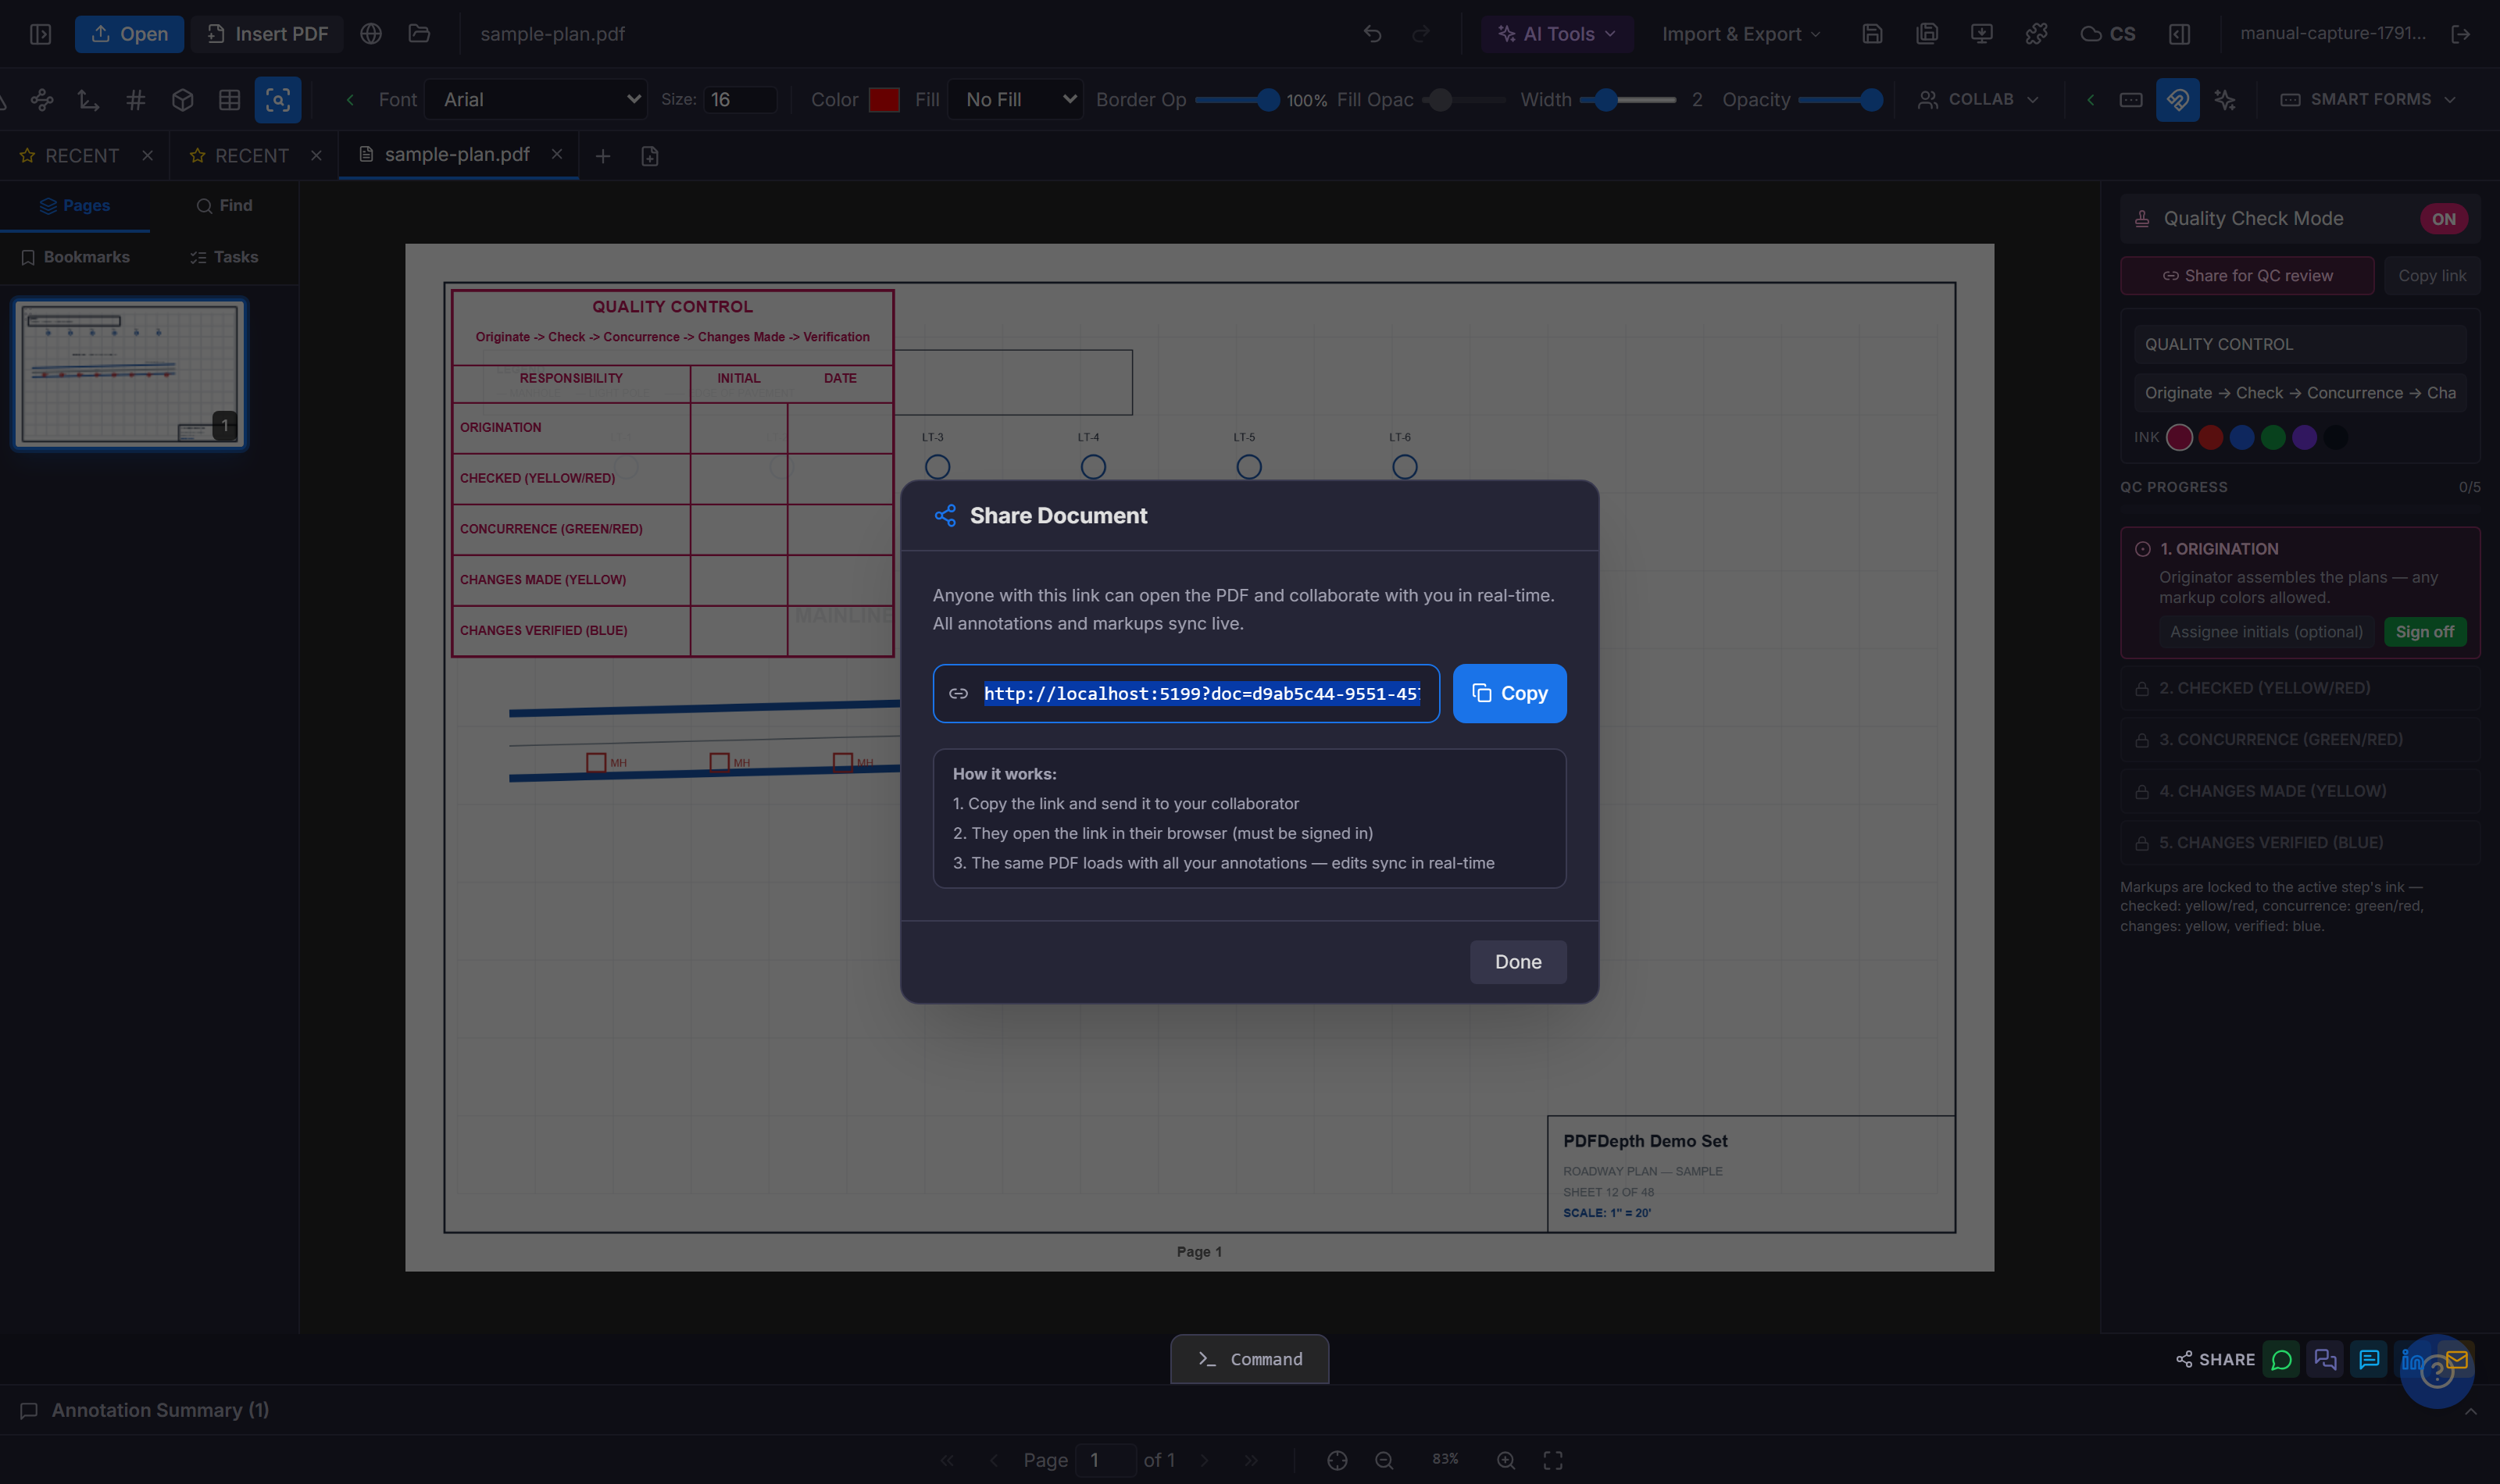
Collaborate Mode turns a document into a shared workspace: comments, roles (owner, editor, commenter, viewer), and live sync — annotations and markups from every participant appear in real time. Sharing is by smart link, which can be view-only, email-gated, password-protected, or full-access — and revocable at any time.
- 1Toggle Collaborate Mode ON (or click Share in the footer).
- 2Create a smart link — pick the access level, optional password or email gate.
- 3Send the link; recipients open it in a browser — no install, and view-only links need no account.
- 4Comments, markups, and edits sync live across everyone on the link.
- 5Track opens and engagement; revoke or expire the link from the same panel.
Chapter 13
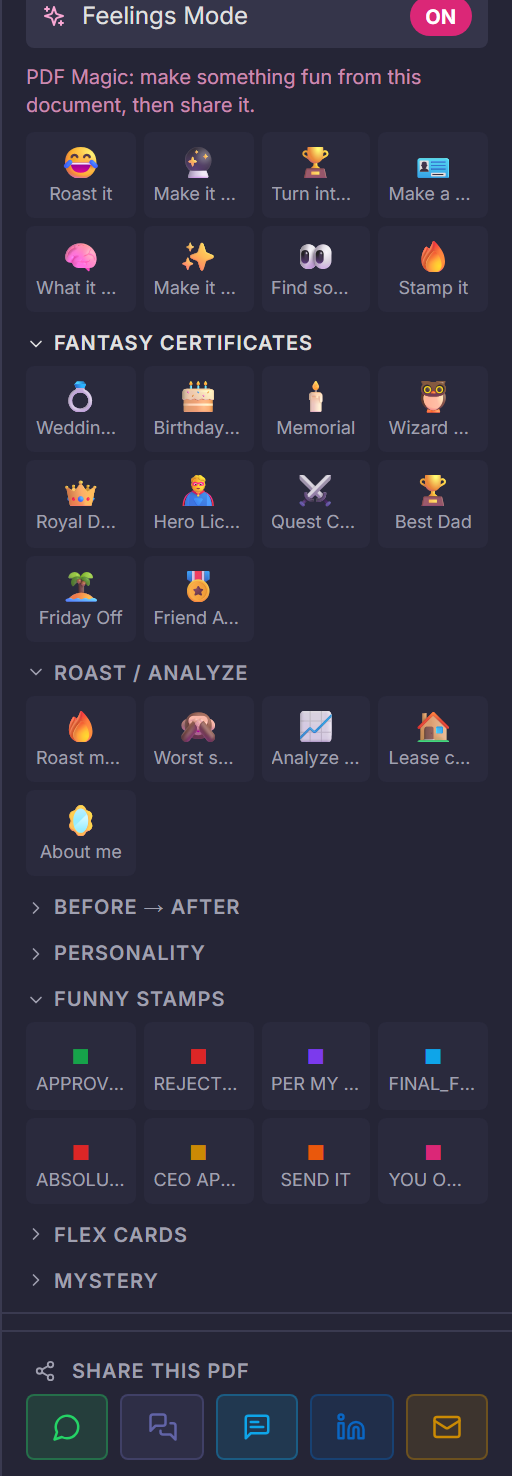
Feelings Mode
Feelings Mode reads the document’s tone — how a letter, proposal, or email draft will land on the reader before you send it. It analyzes the text and reports the emotional register so you can adjust wording before it goes out.
- 1Open the document and toggle Feelings Mode ON.
- 2Read the tone report in the sidebar — the detected register and the signals behind it.
- 3Revise the text and re-run to compare.
Chapter 14
Full Screen Mode
Full Screen Mode strips the interface to just the document — for presenting a drawing in a meeting, reviewing on a tablet in the field, or reading without chrome. Toggle it on from the modes list; everything else is still there when you toggle back.
Chapter 15
AI Plan Review
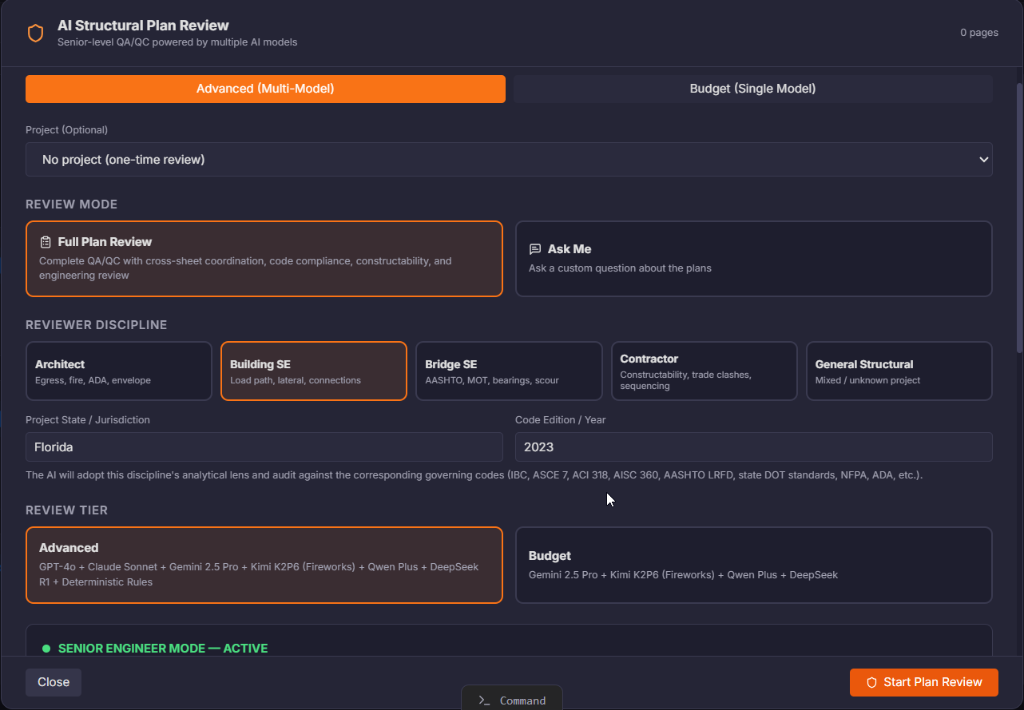
AI Plan Review runs a structured first-pass quality check on engineering and architectural drawings. Pick the review mode (full plan review or Ask Me), the reviewer discipline (architect, structural, MEP, civil, contractor), the jurisdiction and governing codes, and the review tier — single model budget or the advanced multi-model run combining six AI models, deterministic rules, and cross-reference audits. Findings group by sheet with severity labels; verify each, apply markups to the PDF, and export the report.
- 1Open the set and launch Plan Review from AI Tools (or the welcome card).
- 2Configure: review mode, reviewer discipline, project state/jurisdiction, code editions, and tier.
- 3Run the review — the dashboard shows each model’s status (a failed model is shown, not hidden) plus deterministic-rule and cross-reference findings.
- 4Work the findings: grouped by page, labeled critical/major/moderate/minor, each with an Open button to jump to the sheet.
- 5Verify on the drawing, apply selected findings as markups, and export the report for the QC record.
Every finding is a candidate to verify, not a verdict — AI surfaces issues, the engineer decides. Zero findings from one model does not mean the set is clean.
Chapter 16
AI Tools menu
The AI Tools dropdown in the header collects the AI features that work on the open document: Chat with PDF (natural-language answers with source citations), AI Mind Maps, Document Summary, Plan Review, PDF Timeline, Engineering Parameters, Address Scanning, Element Identification (BIM), Photo Analysis, AI Auto-Detect Scale, Auto-Count, and Draft RFI.
- 1Open AI Tools in the header and pick the feature.
- 2Chat with PDF — ask questions in plain language; answers cite the document.
- 3AI Mind Maps — a generated concept map of the document’s content.
- 4Document Summary — key points, executive summary, section breakdowns.
- 5Auto-Detect Scale — OCR reads the title block and sets measurement calibration.
- 6Auto-Count — box a symbol; template matching counts it across pages.
Chapter 17
PDF Timeline
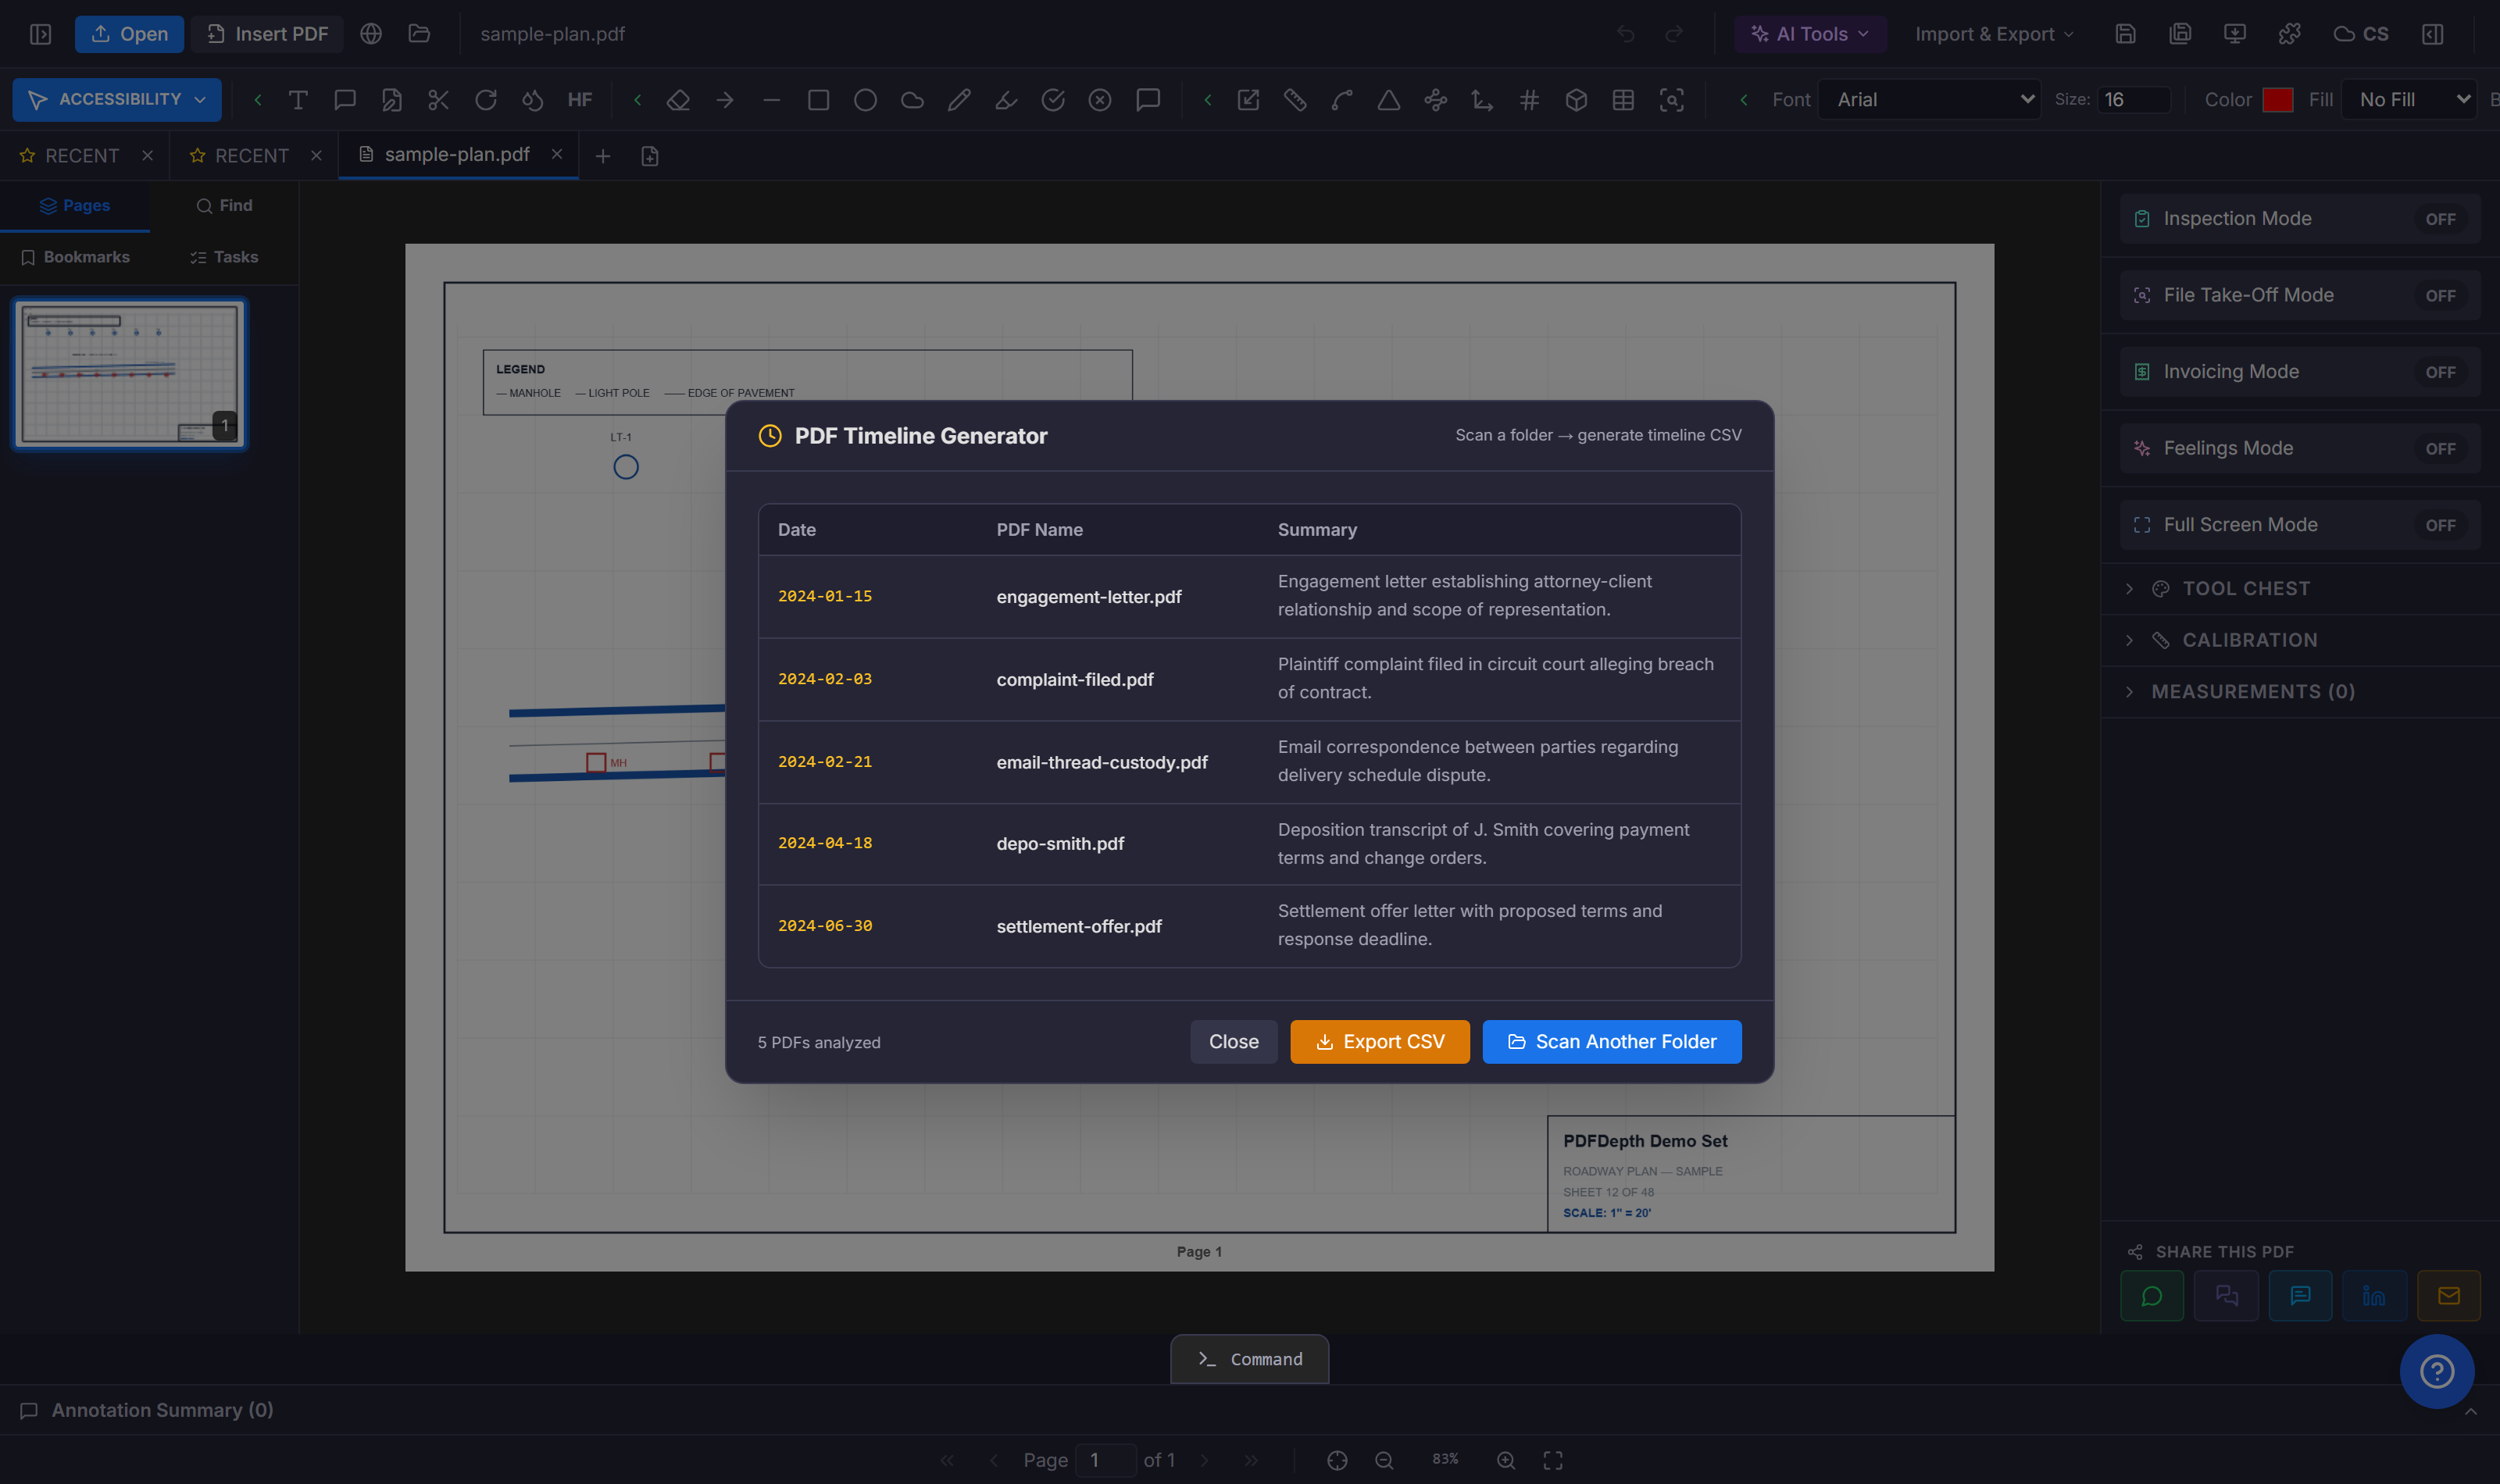
PDF Timeline builds a chronology of a matter from a folder of documents — engagement letters, filings, correspondence, depositions, offers. AI reads each PDF, pulls the key date and a two-line summary, and sorts everything chronologically into a table you can export to CSV for the case file. Built for legal and claims work.
- 1AI Tools → PDF Timeline (or the Legal tools).
- 2Point it at a folder of case documents.
- 3Review the generated chronology — date, document, two-line summary per row.
- 4Export CSV for the case file or the chronology exhibit.
Chapter 18
File Take-Off Mode
File Take-Off Mode runs the takeoff workflow against plan files — for users who want the counting/measurement pipeline driven from the file set rather than the guided scope picker.
Chapter 19
Smart Forms
The SMART FORMS toolbar places real form fields on any PDF: text fields, checkboxes, radio buttons, dropdowns, date pickers, signature fields, initials, file upload, number, and email. Pick the field type, click to place, and the fields export as native AcroForm elements where the format supports it.
- 1Open SMART FORMS in the toolbar and pick the field type.
- 2Click on the page to place it; Escape cancels placement.
- 3Configure the field (label, required, options for dropdowns) in the edit overlay.
- 4Fill forms interactively, or enable Smart Form Filling for AI-assisted completion.
- 5Export — fields become real fillable form fields in the saved PDF.
Chapter 20
Digital signatures
Sign documents directly in the workspace: draw, type, or upload a signature, place it on the page, and save — or use signature form fields for counterparty signing workflows through shared links.
- 1Open the signature tool (toolbar) — draw it, type it, or upload an image.
- 2Place and size it on the page; it saves as real PDF content.
- 3For counterparty signatures, place Signature/Initials fields via SMART FORMS and share the link.
Chapter 22
Split View & compare
Split View shows two panes side by side — different sheets of the same set, or the same sheet at different detail levels — with optional synchronized pan and zoom for revision comparison. Toggle it from the command line (SPLIT H / SPLIT V) or the View controls.
- 1Ctrl+9 → SPLIT H (horizontal) or SPLIT V (vertical).
- 2Each pane gets independent page and zoom control.
- 3Enable sync to lock pan/zoom together for overlay-style comparison.
Chapter 23
Command line & keyboard
The docked command line works like an AutoCAD command prompt: type a command or alias and Enter. Nearly every tool is reachable — measurements, annotations, cloud operations (CLOUD:OCR, CLOUD:TO-WORD, CLOUD:REDACT), folder operations, split view, and settings. Power users stay off the mouse.
- 1Ctrl+9 focuses the command line.
- 2Type a name or alias — K calibrate, B pin/task, SPLIT H/V, CLOUD:OCR, FOLDER:EXTRACT_SCHEDULES.
- 3Autocomplete shows matching commands with descriptions as you type.
Chapter 24
Saving, export & conversion
Edits autosave locally as you work. Export produces a real PDF with annotations, form fields, and measurements baked in — plus specialty exports: Excel from takeoff/measurements, DXF for markups (markups-only CAD export), CSV from timelines, and Office-format conversions (Word, PowerPoint, HTML) via the cloud pipeline.
- 1Work normally — autosave keeps the document current in the browser.
- 2Export/download the PDF: annotations and fields are real objects in the file.
- 3Import & Export menu — DXF, Excel/CSV takeoff exports, Word/PPT/HTML conversion, print.
Chapter 25
Where your files live
Core editing runs client-side: pages render in the browser, and markups, measurements, and edits are local operations. A file goes to the server only when you deliberately use a cloud feature — live collaboration links, cloud AI tools, format conversion — or when you run an AI feature that sends document text or images to the model you chose.
Chapter 26
Free tools on pdfdepth.com
The marketing site hosts a companion set of free browser tools — no signup, no upload: PDF organize/edit utilities, converters, background removal, and the construction calculators (scale, concrete, area, linear footage, unit conversion, PDF scale, takeoff, and cut & fill volume). Everything at pdfdepth.com/free-tools runs locally in the browser.
Chapter 27
Getting help
The in-app Help chat answers feature questions in place; support@pdfdepth.com reaches a human. Video walkthroughs are linked from the resources pages, and the blog at pdfdepth.com/blog documents each feature against the live workspace.
Open the workspace and try it
Everything in this manual runs in the browser — free for 14 days, no credit card.
Open PDFDepth